Getting started
From an empty workspace to a link you can send, and the list on Home that walks you through it.
Written By Tailored Folio
Last updated 1 day ago
This page walks you from an empty workspace to a link you can send. The Getting started list at the top of Home follows the same path and ticks off each step as you do it.
The Getting started list on Home
While you're setting up, Home opens with a Getting started list of six steps:
Add your career history: at least one role in Your career, imported from a resume or added by hand.
Add your name and photo: a display name. The photo is up to you.
Write your first story: a story you've saved with Save Story.
Make a variation ready to share: a variation saved with a confidentiality.
Build a Folio: a Folio with at least one story in it.
Publish and copy your link: a Folio you've published.
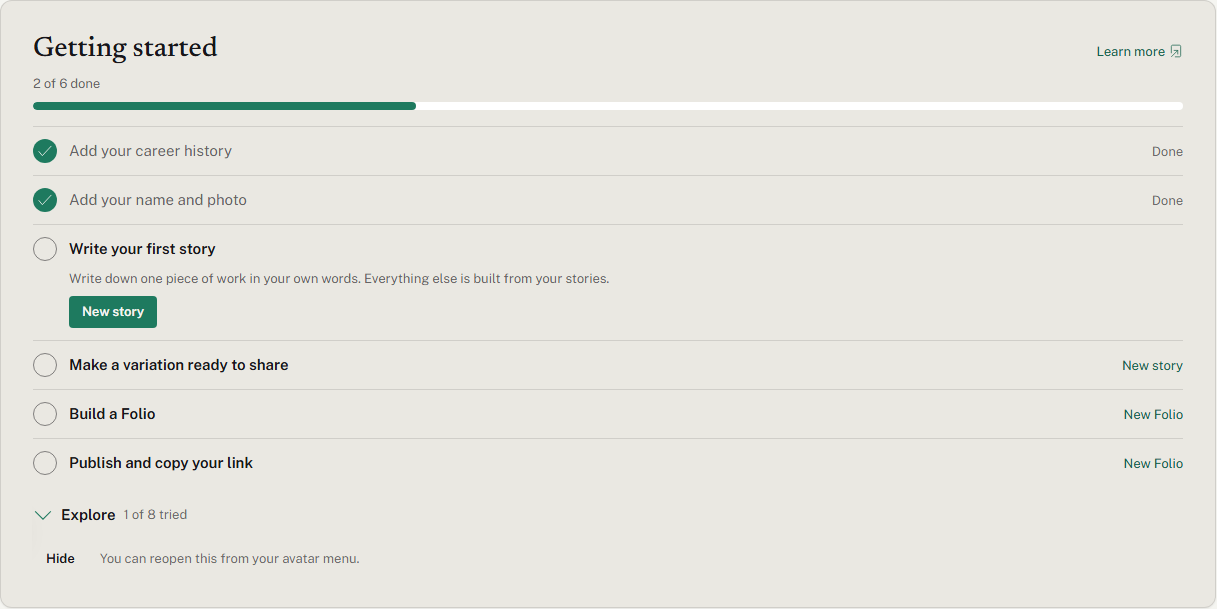
Do them in any order. The next one you haven't done is open, with a button that takes you straight to where you do it, and a line reads, for example, "2 of 6 done". You never tick anything yourself: a step ticks off when the real thing is in your workspace. Once a step is done it stays done, even if you later archive that story or turn that link off.
Career history comes first on purpose. A story's Job title suggests roles from it, so your first story goes faster once it's there. Every step works on every plan, Free included.
Explore
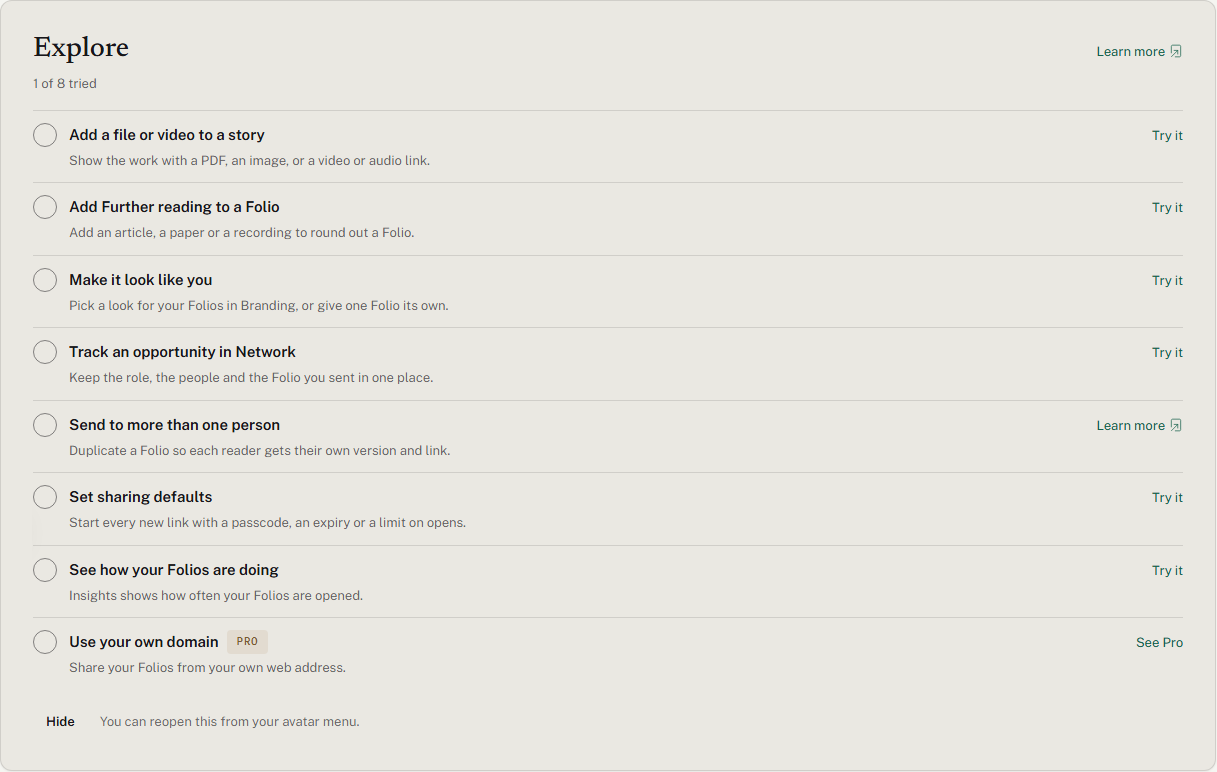
Below the six steps, Explore lists other things worth trying. Each one ticks off once you've tried it:
Add a file or video to a story
Make it look like you: change your look in Branding, or give one Folio its own theme or welcome layout
Add Further reading to a Folio
Track an opportunity in Network
Send to more than one person: ticks off once you have two Folios, since duplicating a Folio is how each reader gets their own
Set sharing defaults
See how your Folios are doing: open Insights
Tell the AI how you write: add writing preferences or a glossary word in AI & writing
Use your own domain (Pro)
The first three depend on what you told us you mainly use Tailored Folio for; the rest follow in this order. On Free, Use your own domain carries a Pro label, links to Plan & billing, and doesn't count toward what's left.
When all six steps are done, the list says You're set up once, then becomes a smaller Explore card with what you haven't tried yet. That card goes away once you've tried everything your plan includes.
Hiding it
Choose Hide to take the list off Home. It stays hidden wherever you sign in. To bring it back, open your avatar menu and choose Getting started.
1. Create your account
Go to app.tailoredfolio.com and choose Sign up. You will be asked for an email address and to confirm it. Before your workspace is created you read and agree to the terms, privacy policy and acceptable use policy; the same documents are always available from the footer of every page.
Next you are asked one question: what you mainly want to use Tailored Folio for. Pick the closest answer, or choose Skip for now.
Add your career history and your name
Two things are worth doing before your first story, because everything else reads from them:
Your career. Open your avatar menu, then Settings, then Your career. Import your jobs from a resume, or add them by hand. A story's Job title suggests roles from this list, and the AI uses it so its questions and drafts fit your background. See Your career.
Your name. In Settings, then Name & photo. Readers see it at the top of every Folio you send. Publishing warns you if it's missing. A photo is optional.
2. Write down one piece of work
On your home page, choose New story. Start with Details: a working title (the only thing you must fill in, and only you see it), the organization, your job title, the industry, and when it happened. Leave the end date empty if the work is still going.
Then pick how you want to write:
Guided, six blocks. Six prompts, in any order: Context, Complexity, Opportunity, Approach, Outcome and Takeaway. Good when you are starting from memory.
Bring your own. One box for the whole story. Good when you already have the material, or would rather write it your way.
Write it the way you would tell a colleague you trust. Include the parts you could not put on a public page: your story is private and stays that way. Rough notes are fine, because the polish happens in a variation. Everything saves as you go. Choose Save Story on the last step.
When you save, Tailored can read the story and fill in tags, what it demonstrates, and other details for you to check. See Stories: writing down your work.
3. Make a variation ready to share
Readers never see your story itself. They see a variation: a version of the story shaped for a particular reader or purpose.
On the story's page, choose Create variation. Give it a name (just for you), optionally link the opportunity it's for, say what it needs to do, and pick a layout. Story can be published on every plan; Outcomes and Visual can be built and previewed on Free and need Pro to publish.
To make it ready to share, choose its Confidentiality and select Save:
Public-safe: names can appear as written, and readers see the organization.
Anonymized: names you keep private are described instead of named.
Permission required: only with the organization's sign-off.
Private only: never goes into a Folio.
Only a saved variation with a confidentiality can be published.
4. Build a Folio
Under Folios, choose New folio. Give it an internal name for yourself ("Acme, Head of Operations"), optionally link the opportunity, and pick a welcome layout. Letter works on every plan; Career timeline, Overview grid and Evidence matrix need Pro to publish. You can change the layout later.
Then, in the editor:
Check the title readers see. It starts as the internal name.
Write the welcome message: the first thing they read. Who you are, why you are sending this, what to look for.
Add stories from your library, in the order they should be read, and pick which variation each one uses.
Add a short note to any story about why you chose it. Readers see it as Why I chose this for you. The story itself is not changed.
Switch on How they can reach you: an email link, your LinkedIn profile, or a resume they can download.
Optional: add Further reading (papers, articles, op-eds) below the stories, or give this Folio its own theme. Preview shows exactly what a reader will see.
5. Publish and share
Choose Publish. The publish box lists anything that has to be fixed first in red (for example, a story whose variation isn't ready, or no welcome message), and things worth a look in amber, which don't stop you. Then the Folio is frozen behind a link.
Copy the link from the Share link panel and send it however you like. Later edits stay with you until you choose Publish changes.
If you want to control who can open it, see Share links: passcodes, limits, and turning a link off. To send the same work to several people, see Sharing the same Folio with several people.
Was this helpful?
Still need help? Ask the team